Create a high resolution headshot from your own photos, with studio-quality lighting, clothing, and background handled for you. See an actual result and its measured dimensions below. Get started for free; styling preferences are optional.
Your photos are enough to start. Add a clothing, background, or framing preference if you have one.
Use Professional-Headshot.ai for free · No account required
A finished portrait, with dimensions you can verify
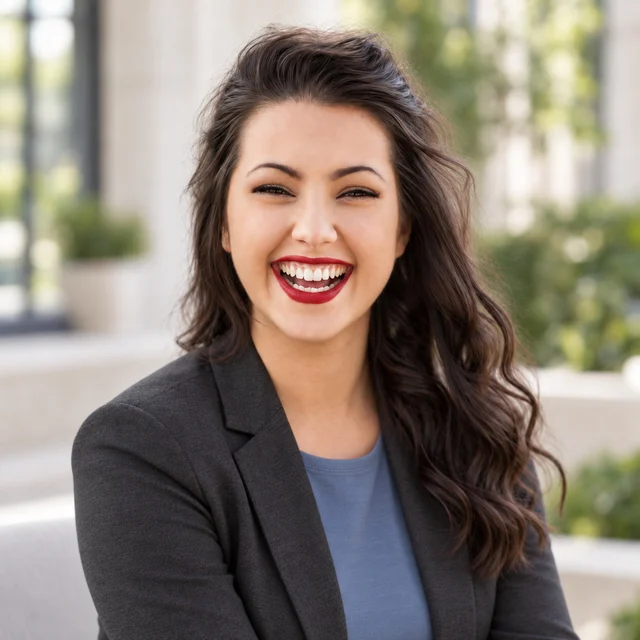
A high resolution headshot needs useful image detail at the size you will use it. Start with the complete portrait: clear facial light, familiar features, considered clothing, and a background that supports the face. Then read the downloaded file's pixel dimensions instead of judging its resolution from a small webpage preview.
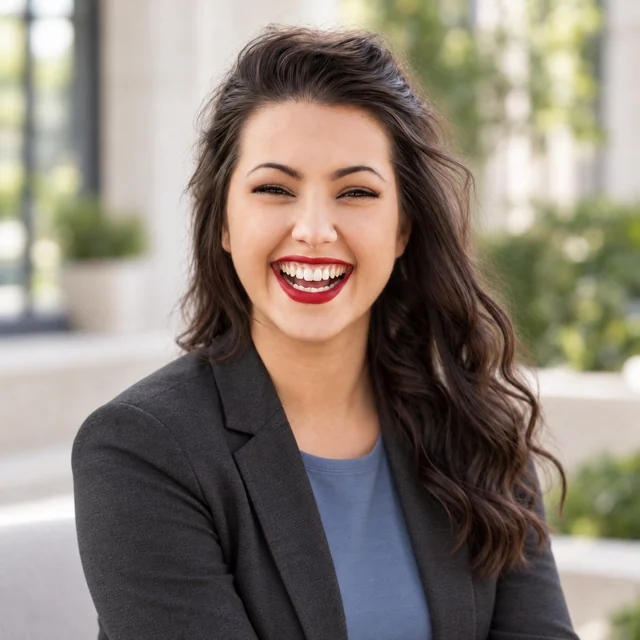
Actual product resultOne saved recommended result, measured at 1200 × 1200 pixels in JPEG format. Reference photograph: Michael Dam / Unsplash.
Measured example file
Pixel dimensions
1200 × 1200 px
Total pixels
1.44 megapixels
File format
JPEG
The charcoal jacket and blue neckline give this high resolution headshot a coordinated outfit. Soft light keeps the eyes and open smile visible, while the courtyard falls out of focus behind the person. That photographic presentation is part of the result; a larger pixel count alone would not create it.
For your own high resolution headshot, upload clear photos showing how you look now. Everyday clothes and ordinary surroundings can provide the reference. We arrange the finished light, outfit, and setting together. You can describe a recipient's styling requirements, or start with your photos alone.
What image sizes can I download?
In the full paid workflow, standard generation prepares JPEG deliveries for the purpose of each scene. A high resolution headshot for a general profile uses a square target; a speaker introduction uses a portrait target. We coordinate the light, clothing, background, and framing around that intended use.
Each scene uses the target for its identified purpose. Mention your intended use when it matters, or start with your photos alone for a general portrait. You can add a clothing or background preference without configuring photographic settings.
Current standard paid delivery targets
Scene or use
Output target
General profiles and LinkedIn
1200 × 1200 px
Resume
1000 × 1333 px
Company website
1600 × 1200 px
Speaker biography and personal brand
1200 × 1500 px
These dimensions describe the delivered image after any cropping or resizing; they do not show how much facial detail was present before that processing. Free-use results and later edits can have different dimensions. Use the downloaded file's actual pixels for the final placement.
See what a smaller copy leaves behind
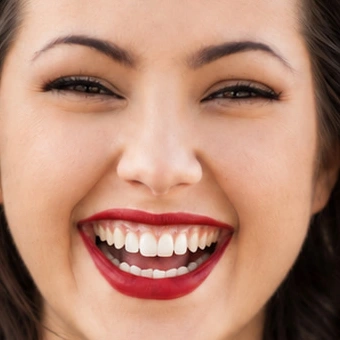
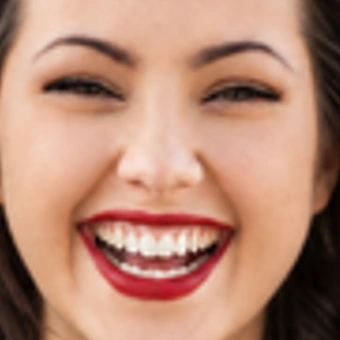
Both details below come from the same high resolution headshot. The first comes directly from the 1200-pixel file. For the second, we reduced the complete portrait to 320 × 320 pixels before enlarging the same facial region. The light, clothes, and expression are identical; the amount of image information is different.
Detail from the 1200 px resultA region of the actual delivered JPEG. Look at the eyelids, hair, and transitions around the smile under the portrait's soft light.Detail from a 320 px demonstration copyThe same portrait reduced, then enlarged for this comparison. It illustrates detail lost in a small copy, not a separate AI result or a before-and-after enhancement.
Both regions are shown at the same display size for comparison. Your screen may scale them.
At thumbnail size, the two versions can look similar because the face, smile, and clothing still read clearly. Enlarging the small copy makes the eyelashes and hair softer. Keep the image you download from the result instead of saving an avatar or taking a screenshot. A high resolution headshot can lose useful detail on its way to the final page even when the original portrait was suitable.
Pixel dimensions and photographic quality answer different questions. More pixels give a file more room for display or print; they do not establish that the face is in focus or recognizable. Clear references and considered studio light help the portrait itself. In the full paid workflow, we also check and select results before delivery. A high resolution headshot should combine that finish with enough pixels for its intended placement.
One high resolution headshot, two different requests
Imagine an event organizer wants your portrait for a speaker webpage and a printed program. You like the existing headshot's jacket, natural smile, and soft light. Before creating another look, compare the requested image sizes with the actual file. The same high resolution headshot may already suit both uses when the dimensions and composition fit.
How the 1200 × 1200 px example compares
Intended use
Requested pixels
What the example can supply
Square webpage image
At least 600 × 600 px
The file exceeds both pixel minimums. Its square composition already includes the hair, shoulders, and jacket; the organizer can prepare a smaller web copy.
4-inch square at 300 PPI
4 × 300 = 1200 px per side
The file meets this pixel calculation without an additional crop. That does not guarantee printed sharpness, paper appearance, or the organizer's approval.
A revised 8-inch square at 300 PPI
8 × 300 = 2400 px per side
This file falls short of the requested pixels. Sending the same image with a different resolution label would not provide the missing detail.
The pixels stay the same when the layout grows
1200 px ÷ 8 inches = 150 PPI
The example could occupy an 8-inch square at 150 pixels per inch, but that is not the revised 300-PPI request. For a high resolution headshot, agree on the actual print size and required pixel density. Ask whether a smaller placement is suitable, or obtain a file with enough genuine detail for the larger use. Studio styling does not supply missing pixels.
If the organizer changes the jacket color or background, describe that change through eligible paid editing. Your original references continue to guide the person. Use the successful light and expression as the direction, then check the revised file's dimensions before sending it for the updated placement.
Make your high resolution headshot fit the request
Your portrait preferences guide the photographic look. The downloaded file tells you what pixels are available. Use both when preparing a high resolution headshot for a real recipient, with the clear face, clothing, and background still working at the final size.
Bring the visual brief to the form
Use current references for your appearance. Add a plain background, a particular level of dress, or room around your shoulders when those instructions matter. You can leave preferences empty and let us coordinate the studio look. A request for a high resolution headshot does not mean you need to buy clothes or take a finished studio photograph first.
Keep the downloaded image file
Use the download available on your result, then read that file's width and height in your photo viewer or file information. Check the file you will actually send. A webpage thumbnail, message-app copy, or screenshot may have fewer pixels, even though it shows the same high resolution headshot and the same studio styling.
Match the final placement before sending
Compare the pixels with the recipient's stated minimum or print-size calculation. If the layout needs a crop, use the dimensions remaining after that crop. Keep the hair, chin, and clothing balanced in the frame. Send the file separately and mention its actual dimensions; ask the recipient to clarify a request that says only 'high resolution' or '300 DPI'.
Professional-Headshot.ai brings studio styling, checked selection, and result editing into one workspace. Start your high resolution headshot in the form above, then use the available download and its actual dimensions for your intended placement.
Why choose us for your high resolution headshot?
Create a high resolution headshot with a studio-quality finish and a clear next choice. In the full paid workflow, we check options against your original photos and select one recommended headshot plus two alternatives for each scene. We handle the presentation and initial selection; you keep a focused result for the introduction you need.
One Recommended Headshot. Two Alternatives.
For each paid scene, we select one recommended portrait and two alternatives. Start with the recommendation for your high resolution headshot; view alternatives only if you want another option. You do not have to sort through a large batch before preparing your image file.
CreateCheckSelect
Quality Checks Before Delivery
We look for visible issues such as distorted glasses, unnatural eyes or teeth, and changes to facial features. Affected images are repaired or replaced where possible; those that still fail are left out. Your high resolution headshot should have checked facial detail as well as considered lighting and clothing.
Keep the Details That Make You Recognizable
Your age, skin tone, hairstyle, glasses, facial hair, and natural facial details should remain part of the result. Your original photos guide those features. A high resolution headshot should introduce the person someone will meet, with clear studio light supporting your familiar appearance.
Your Studio-Quality Look, Handled for You
We coordinate clothing, background, lighting, and overall styling for your high resolution headshot. Your photos are enough to begin. Add a recipient's visual requirements if you have them, or let us make the styling choices; a complete photographic brief is not required.
Refine the Result Instead of Starting Over
With eligible paid editing access, select a result and describe a change to the presentation. Original photos continue to guide the edit, and earlier versions remain available during storage. Refine the look of your high resolution headshot while keeping the previous version for comparison.
A high resolution headshot has enough clear image detail and pixels for its intended use. There is no single pixel count that suits every profile, speaker page, and printed portrait. Compare the actual file dimensions with the destination's requirements, while making sure the face, light, and composition remain suitable.
How many pixels will my headshot have?
For a high resolution headshot in standard paid generation, general profiles and LinkedIn target 1200 × 1200 pixels; resumes target 1000 × 1333; company websites target 1600 × 1200; speaker biographies and personal brands target 1200 × 1500. Your scene's purpose determines its delivery target. Free-use results and later edits can differ, so check the dimensions of the file you download.
Can I create a high resolution headshot for free?
Use Professional-Headshot.ai for free with your own photo; no account is required to begin. The full paid workflow adds checked selection, one recommendation and two alternatives per scene, and editing under the relevant access. Check the download options available on your result rather than assuming all file options and paid features are included in free use.
Is a 1200 × 1200 pixel headshot enough for print?
For the example high resolution headshot, 1200 pixels divided by 300 pixels per inch gives 4 inches on each side without an additional crop. A larger print at the same density needs more pixels. Confirm the printer's requirements and the actual image detail; satisfying the arithmetic does not guarantee the finished print.
Does changing the file to 300 DPI improve the photo?
Changing the print-resolution value without resampling does not add pixels or improve facial detail. A high resolution headshot needs enough pixels at the actual print size. When a brief says '300 DPI', clarify the intended width and height as well. Requests often use DPI loosely for the image's pixels per inch.
Do you guarantee a 4K headshot?
No. Standard paid generation uses the delivery targets listed above. Those sizes, including the 1200 × 1200 example, do not meet a requirement for a 3840-pixel edge. Writing '4K' in a styling preference does not add a fixed-resolution export setting. If your recipient requires a 4K high resolution headshot, confirm the exact pixel requirement before using the available file.
Why does a high resolution headshot look soft when enlarged?
The file may have been enlarged from a smaller copy, the face may occupy too little of the original frame, or the image itself may contain soft detail. More pixels alone do not establish sharpness. Start with clear references and keep the downloaded result; a screenshot or small avatar can discard useful detail and the subtle transitions in studio light.
Is a larger file in megabytes always better?
No. Pixel dimensions, compression, format, and picture content all affect the file's byte size. A detailed backdrop may increase bytes without improving the face. For your high resolution headshot, follow any actual upload limit alongside the required pixel dimensions and the portrait's visible quality. If only a minimum megabyte value is given, ask the recipient what image dimensions they need.
Will cropping reduce the resolution I can use?
Cropping removes pixels. A high resolution headshot can meet a requirement before cropping and fall short afterward. Check the remaining width and height, keeping the hair, chin, and useful shoulder framing intact. Leave comfortable room around the head when describing the studio composition, then use the recipient's real layout.
Do I need a professional camera for the reference photo?
No. A clear current photo or selfie can guide your high resolution headshot. The reference needs to show your recognizable features; it does not need the final outfit, background, or studio lighting. A larger file with hidden eyes or heavy filtering is not automatically a better reference than a clear everyday photograph.
Can I enlarge an existing photo without changing its appearance?
This page creates a new AI portrait guided by your references. It is not a pixel-preserving enlargement service for an existing photograph. If your current photo already has the studio presentation and dimensions you need, you can use that file. Creating a high resolution headshot here is useful when you want a new photographic look.
Can I adjust the portrait after downloading it?
With eligible paid editing access, select a result here and describe a clothing, background, lighting, or other presentation change. Original photos guide the edit, and earlier versions remain available during storage. Download the revised high resolution headshot through its available options and check that file's dimensions. Editing does not repeat the complete initial checking workflow.
Create a high resolution headshot for your next introduction
Start with your own photos. We arrange the studio-quality light, clothing, and background around your recognizable appearance. Use the finished image and its actual dimensions together when preparing your introduction.